
Meteor + ReactJS 學習筆記(三)使用 Salesforce Lightning Design System
除了上一篇 Meteor + ReactJS 學習筆記(二)使用 Semantic UI 所介紹的 Semantic UI,也可以選擇 Salesforce 所開發的 Salesforce Lightning Design System 來作為 ReactJS Web 應用中的 UI 元件。要讓 Meteor + ReactJS 搭配使用 Lighting Design System 有兩種方法,一種是直接使用官方的 design-system-react ,另一個方法是使用 Propertybase 這家公司基於官方的 Salesforce Lighting Design System 所開發的 React LDS 。
使用官方 Salesforce Lightning Design System for React
Step 1: 建立一個 Meteor + ReactJS project
meteor create --react meteor-slds-demo

cd meteor-slds-demo
Step 2: 安裝 Salesforce Lightning Design System for React
meteor npm install --save @salesforce-ux/design-system @salesforce/design-system-react Step 3: 複製 CSS 檔
cp node_modules/@salesforce-ux/design-system/assets/styles/salesforce-lightning-design-system.min.css client/Step 4: 複製 Lightning Design System 所需要的圖示及字型檔
mkdir public

cp -r node_modules/@salesforce-ux/design-system/assets/icons public/

cp -r node_modules/@salesforce-ux/design-system/assets/fonts public/
Step 5: 使用方式範例
必須在 client/main.jsx 中引入 salesforce-lightning-design-system.min.css
於 client/main.jsx 一開頭,加入以下程式碼
client/main.jsx
import "./salesforce-lightning-design-system.min.css";可使用元件及範例可參考官方網站的說明文件
以下是使用 Icon Button 的範例
imports/ui/App.jsx
import React from "react";

import { Button, IconSettings } from "@salesforce/design-system-react";

const App = () => (

  <div>

    <IconSettings iconPath="/icons">

      <Button

        iconCategory="utility"

        iconName="download"

        iconPosition="left"

        label="Click Me"

      />

    </IconSettings>

  </div>

);

export default App;
Step 6: 啟動 meteor 專案
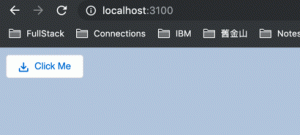
meteor於瀏覽器瀏覽 http://localhost:3000 會得到以下使用 Button UI 的畫面
使用 Propertybase React Lightning Design System
Step 1: 建立一個 Meteor + ReactJS project
meteor create --react meteor-plds-demo

cd meteor-plds-demo
Propertybase React Lightning Design System 跑在 Meteor 1.8.1 之前的版本會有些問題,所以需要把 Meteor 升級到至少 1.8.2 版,升級的指令如下(目前(2019/09) 1.8.2 還只有 beta 版)
meteor update --release 1.8.2-beta.16Step 2: 安裝相關模組
meteor npm install --save react-dom moment moment-timezone moment-range

meteor npm install --save react-lds
Step 3: 複製 CSS 檔
cp node_modules/react-lds/react-lds/assets/styles/salesforce-lightning-design-system.min.css client/Step 4: 複製 Lightning Design System 所需要的圖示及字型檔
mkdir public

cp -r node_modules/react-lds/react-lds/assets/icons public/

cp -r node_modules/react-lds/react-lds/assets/fonts public/
Step 5: 使用方式範例
必須在 client/main.jsx 中引入 salesforce-lightning-design-system.min.css
於 client/main.jsx 一開頭,加入以下程式碼
client/main.jsx
import "./salesforce-lightning-design-system.min.css";可使用元件及範例可參考官方網站的說明文件
以下是使用 Icon Button 的範例
imports/ui/App.jsx
import React from "react";

import { Button, Badge } from "react-lds";

import AssetPathProvider from "./AssetPathProvider.jsx";

const App = () => (

  <div>

    <h1>Welcome to Meteor!</h1>

    <AssetPathProvider>

      <Button icon="download" sprite="utility" title="Hover Me">

        Click Me

      </Button>

      <Badge theme="warning">1234</Badge>

    </AssetPathProvider>

  </div>

);

export default App;
imports/ui/AssetPathProvider.jsx
import { Component } from "react";

import React from "react";

import PropTypes from "prop-types";

class AssetPathProvider extends Component {

  getChildContext() {

    return {

      assetBasePath: "assets/"

    };

  }

  render() {

    const { children } = this.props;

    return <div>{children}</div>;

  }

}

AssetPathProvider.propTypes = {

  children: PropTypes.node.isRequired

};

AssetPathProvider.childContextTypes = {

  assetBasePath: PropTypes.string

};

export default AssetPathProvider;
Step 6: 啟動 meteor 專案
meteor於瀏覽器瀏覽 http://localhost:3000 會得到以下使用 Button UI 的畫面
使用 ES6+ 語法 Node.js 於 AWS Lambda
如果你有某種偏執狂,就是想要用最新版本的 Javascript ,無論是 ES6 ( ES2015 ) ES7 ( ES2016) 寫 node.js,而且計畫寫 Serverless 並且部署到 AWS Lambda (例如: webhook),那希望這篇文章對你有些幫助。
Step 1: 安裝 node-lambda 執行以下指令,安裝 node-lambda
npm install -g node-lambda
node-lambda 是一套 CLI (command line tool) 工具,可以讓開發者在本地端執行及測試 AWS Lambda 的 node.js 應用程式,並可將其部署到 Amazon Lambda 上 詳細請參考 https://www.npmjs.com/package/node-lambda
Step 2: 下載 node-lambda-babel-template
已經有善心人士把 webpack 及 Babel 加入進了 @motdotla’s node-lambda-template 所做的 node.js 程式模板,讓我們可以使用最新版本的 Javascript 撰寫 node.js 跑在Amazon Lambda 上 執行以下指令,下載 node-lambda-babel-template
curl -o- https://ribjyr1g9l.execute-api.us-east-1.amazonaws.com/nodelambdababeltemplate/latest | bash
將 node-lambda-babel-template 改為自己的專案名 (例:node-lambda-babel-hello-world)
mv node-lambda-babel-template node-lambda-babel-hello-world cd node-lambda-babel-hello-world
Step 3: 修改 package.json
先開啟 package.json,將與專案名稱相關的內容,改為自己的專案名。再來由於 node-lambda v0.8 有一個小bug,所以需要將 package.json 中
node-lambda 設定,將版本改為 ^0.11.7
"node-lambda": "^0.11.7", Step 4: 完成 node-lamba setup 執行以下指令
npm install
npm install 會執行 node-lambda setup,下載相關的node_modules並自動產生以下檔案context.json, event.json, .env, and deploy.env 可以參考 https://github.com/motdotla/node-lambda#setup 了解更多內容 打開 .env 檔,修改以下的欄位
AWS_ACCESS_KEY_ID=
AWS_SECRET_ACCESS_KEY=
AWS_ROLE_ARN=
AWS_REGION=
並且將 .env 檔中 AWS_DLQ_TARGET_ARN= 這行移除(否則會出問題)
Note: AWS_ENVIRONMENT 與 AWS_HANDLER 定義在 package.json 中的 npm script,並不是在 .env 中定義,所以記得要是要改 handler name (預設是 default) 要去 package.json 中改 關於 AWS Role 的設定可參考 https://docs.aws.amazon.com/lambda/latest/dg/with-s3-example-create-iam-role.html
Step 5: 編寫程式
接下來就可以開始撰寫程式,預設的啟動程式是 index.js,所以開啟 index.js 加入你自己的程式 (當然是使用 ES6/ES7 語法) webpack 會將 index.js 編譯轉碼至 dist/index.js
npm start
可以修改 webpack.config.js 及 .babelrc ,加入額外你需要的 plugins 及 presets. 使用下面指令,測試你的程式
npm test
修改 event.json 加入你要模擬的 event 事件
Step 6: 佈建至 AWS Lambda 使用下面指令,佈建你的程式至 AWS Lambda
npm run deploy
參考: https://github.com/motdotla/node-lambda https://github.com/motdotla/node-lambda-template https://www.npmjs.com/package/node-lambda-babel-template