如何申請免費SSL憑證讓NGINX 加入 HTTPS 支援
SSL for Free 可以申請 免費SSL憑證 ,唯一缺點就是效期只有90 天,所以每90天要回到網站上重新 renew。不過效期快到之前,會有郵件通知就是了。
Step 1: Create Free SSL Certificate 建立 免費SSL憑證
首先先到 https://www.sslforfree.com/,輸入你要申請 免費SSL憑證 的網址,再按下 Create Free SSL Certificate

Step 2: 確認 Domain 擁有權
接下來的選澤 Manual Verification 透過 DNS 手動確認你擁有這個 Domain

1. 點選Manual Verification

2. 接下來點選 Manual Verify Domain
Step 3:Update DNS Records
接下來畫面會顯示 Update DNS Records,在Update DNS Records步驟2中,會顯示類似下面的說明
2. Add the following TXT records below to the DNS server for each domain (In the Time to Live (TTL) field, enter 1):
1. Add TXT record with the name/host _acme-challenge.www.xxxxx.me with the value b7-sYV7EWFyJxxxxxxKc7wq3RtRaGz6-SIgilDA
2. Add TXT record with the name/host _acme-challenge.yourdomain.com with the value 2rnrUcbVCoUJxxxxxIGycNd_cpUGee8kM
_acme-challenge.www.yourdomain.com 是到時候要加到DNS TXT record中的 name/host值 b7-sYV7EWFyJxxxxxxKc7wq3RtRaGz6-SIgilDA 是 TXT record 的 value 值
Step 4: 於DNS中加入TXT records
這邊以 GoDaddy 為例,在GoDaddy DNS管理工具裡面,按”加入“新建一筆 DNS record
類型選擇 TXT 主機欄位內填入 Step 3 中 TXT name/host 值 (只要填 Domain 前的值,例如 _acme-challenge.www),TXT 值 填入Step 3 中 TXT value值,TTL 選擇自訂,秒數選擇 600
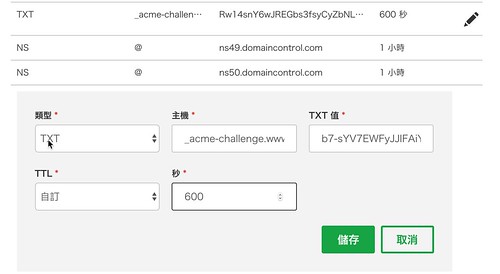
然後按下”儲存“(如果畫面上有出現任何錯誤,可以不用管它)
再重複一次 Step4,把 Step 3中的第二筆 TXT record 也加到 DNS 中
Step 5:驗證TXT record
回到 SSLforFree 網站,大概等個幾分鐘後,點選 Verify _acme-challenge.www.yourdomain.com 連結,驗證TXT record
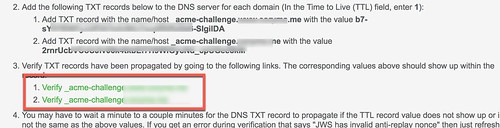
這邊要注意的是,設定文件裡面建議TTL是設定為 1 秒,但GoDaddy DNS的TTL最低只能設定 600 秒,所以設定完之後,可能不能馬上進行驗證,要等個幾分鐘再進行驗證
畫面應該會出現如下(若有 Warning 可以不要理它)
TXT Record(s) Found. Make sure the value matches the value specified by the instruction for with the domain hostname:
Step 6: 建立 SSL Certificate 檔
點選 Download SSL Certificate
在本機上新建一個檔案命名為 <yourdomain.com>.crt (ex: coryma.com.crt),將畫面上 Certificate: 內的值複製貼上到 <yourdomain.com>.crt
在本機上新建一個檔案命名為 <yourdomain.com>.key (ex: coryma.com.key),將畫面上 Private Key: 內的值複製貼上到 <yourdomain.com>.key
在本機上新建一個檔案命名為 <yourdomain.com>.crt (ex: coryma.com.ca-bundle),將畫面上CA Bundle 內的值複製貼上到 <yourdomain.com>.ca-bundle
Step 7:建立 Intermediate/chain certificate
用任一種文字編輯器把 Step 6 中的 <yourdomain.com>.crt 及 <yourdomain.com>.ca-bundle 合併為 <yourdomain.com>_chain.crt
或是在 Mac or Linux 中可以直接使用以下指令
cat <yourdomain.com>.crt <yourdomain.com>.ca-bundle >> <yourdomain.com>_chain.crt Step 8:將 <yourdomain.com>_chain.crt 及 <yourdomain.com>.key 放置到 nginx server 上
例:
放置於 nginx server 上
/etc/ssl/certs/<yourdomain.com>_chain.crt
/etc/ssl/private/<yourdomain.com>.key
Step 7: 於 nginx server 上建立 ssl.conf
於 /etc/nginx/conf.d 建立 ssl.conf
server {
listen 443 ;
server_name <your domain>;
ssl_certificate /etc/ssl/certs/<yourdomain.com>_chain.crt ;
ssl_certificate_key /etc/ssl/private/<yourdomain.com>.key ;
}